Thursday, June 10, 2010

Nokia N900 guide - rsync Tomboy / Conboy notes

To sync Tomboy notes on your Windows PC with Conboy notes on N900, follow the setup below:

N900

As root, edit /etc/rsyncd.conf:

[notes]
path = /home/user/.conboy
uid = user
gid = 29999
read only = false


Then /etc/init.d/rsync restart

PC

Create sync_notes.bat in C:\N900 or your favorite N900 script directory with the following content:

set RSYNC_DIR="C:\Program Files\cwRsync\bin"
set N900_IP=192.168.1.100
set PC_NOTES_DIR="/cygdrive/C/Documents and Settings/User Dir/Application Data/Tomboy/notes/"

pushd .

cd %RSYNC_DIR%

rsync -rulD %1 --progress %PC_NOTES_DIR% --include=*.notes --exclude=Backup %N900_IP%::notes
rsync -rulD --progress %N900_IP%::notes --include=*.notes --exclude=Backup %PC_NOTES_DIR%

popd
pause


Now you are ready to initiate the sync from your PC by running sync_notes.bat. Note that Tomboy cannot be running during the sync.

Tuesday, April 13, 2010

Nokia N900 guide: Transferring files to and from the N900

On the N900...
  1. Install SSH server
  2. Configure password for user account
    1. Go to X Terminal and become root
    2. Enter the command: passwd user
    3. Enter new password when prompted
On Windows...
  1. Download and install Filezilla client
  2. Run the Filezilla client
  3. Go to File -> Site Manager
  4. Create a new called "N900" with the following settings:
    • Host: Your N900's IP address
    • Server Type: SFTP - SSH File Transfer Protocol
    • Login Type: Normal
    • User: user
    • Password: Your user account's password


Optionally, under the N900 site configuration, you can create a "Camera" bookmark which allows to sychronously view the DCIM directory on the N900 and the desired directory on your PC.


Now select the N900 site and hit Connect. You will see something similar to the following:


You can now transfer files between the N900 and your PC simply by dragging and dropping.

To go straight to the DCIM folder on the N900, you can select the bookmark that you have previously created.


As you can see, the local site (left) automatically changed the directory to the one that you configured before. And the remote site (right) jumped to the DCIM folder.

Nokia N900 guide: Setting a password for x11vnc

  1. Open X Terminal (or SSH into the N900 and login as user) and type x11vnc -storepasswd
  2. Enter password when prompted
  3. Gain root
  4. As root user, edit /usr/share/applications/hildon/x11vnc.desktop
  5. Replace the line that says "Exec=/usr/bin/x11vnc" with "Exec=/usr/bin/x11vnc -usepw"

Other customizations for x11vnc on the N900 can be found here.

Monday, April 12, 2010

Nokia N900 guide: startup scripts

I haven't quite figured out how to execute certain scripts on startup until today. There is a rsync script under my /etc/init.d directory but I could not get it to start automatically. I tried update-rc.d but it doesn't do anything other than creating an S20rsync file under /etc/rc2.d.

It turns out N900 uses upstart instead. So all I have to do is to create a file called rsyncd under /etc/event.d with the following content:


start on stopped rcS

console output

respawn

script
exec /etc/init.d/rsync start
end script

Saturday, April 10, 2010

Nokia N900 guide: nano text editor

Everytime I install a new Linux distro, the first thing that I look for is my beloved "nano" text editor. I know "vi" just enough to be able to insert, delete, save and exit but I just can't be productive without nano!

N900 of course comes with vi but it took me a while to get nano installed on it. At first I went to official nano site but couldn't find any binaries for ARM. I found one for Ubuntu but apparently that was incompatible with the Maemo5. Then I found this Maemo wiki page and immediately followed the instructions to add the fremantle/tools repository. To my disappointment, there was still no sign of nano in the App Manager even after numerous refreshes.

So I slided out the N900 keyboard, went to the terminal and fired away the following commands:
root
apt-get update
apt-get install nano

It asked me to install libncurses as well. Fine! Just gimme nano!

And now I can be productive again. Beautiful.

Tuesday, March 30, 2010

Nokia N900 guide - Chinese handwriting recognition (諾基亞 N900 中文手寫輸入示範)

I've had the Nokia N900 for a little over a week now and I have not been able to put this thing down. The web browsing experience is just unmatched by any other "smart" phones out there and simply awesome.

One of the major complaints though is the lack of Chinese language input method. Although there is an unofficial Nokia N900 traditional Chinese package - Nokia N900 繁體中文包, it still does not support Chinese handwriting recognition.

The N900 is armed with a resistive touchscreen which is actually ideal for precise operations like Chinese character handwriting. It's a shame that Nokia doesn't fully take advantage of competitive edge (yet).

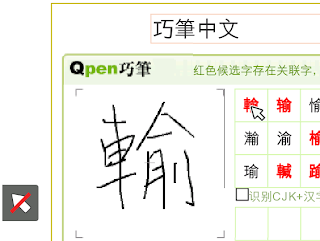
Recently I found this website (Qpen巧筆) which supports Chinese handwriting. I've used it a few times on my PC using a mouse. It works ok but it just doesn't feel comfortable to draw strokes with a mouse.

I logged on to this website from my N900 and gave it a try. In the beginning I couldn't figure out how to use it because every time I tried to draw a stroke, it would drag the screen.

As I get more comfortable with my N900, I learn about "mouse mode". "Mouse mode" on the N900 is the missing piece to unleashing the power of Chinese handwriting recognition. After activating mouse mode, I am now able to hand-write characters on the website!

諾基亞 N900 中文手寫輸入


Click on this video and see for yourself!

諾基亞 N900 中文手寫輸入示範


Here are the steps:
  1. Log on to the Qpen巧筆 website
  2. Zoom in to maximize the writing area and the textbox above it
  3. Activate mouse mode (Follow instructions here)
  4. Start writing!

Tuesday, March 23, 2010

Nokia N900 guide: Sync folders between N900 and PC over wifi (by authorized users only)

In the previous post, I talked about how to use rsync to sync the DCIM folder on the N900. This post will build on that same design and extend it to sync an additional folder by an authorized user only.

First, let's expand /etc/rsyncd.conf. We are going to add another module called "top_secret" and only "santa" can have access to it.

/etc/rsyncd.conf

max connections = 3

[camera]
path = /home/user/MyDocs/DCIM
uid = nobody
gid = 65534

[top_secret]
path = /home/user/MyDocs/.videos
auth users = santa
secrets file = /etc/rsyncd.secrets
Next, create /etc/rsyncd.secrets on the N900 with the following content.
santa:claus
  • (Authorized user is "santa" with password "claus".)

Now go back to Windows and update sync_n900.bat:
set RSYNC="C:\Program Files\cwRsync\bin\rsync"

%RSYNC% -aP santa@192.168.0.105::top_secret "/cygdrive/C/Documents and Settings/N900 User/My Documents/My Pictures/Another N900 Folder"

%RSYNC% -az --progress 192.168.0.105::camera "/cygdrive/C/Documents and Settings/N900 User/My Documents/My Pictures/From N900 Camera"
  • In case you haven't noticed, the arguments for the two rsync commands are slightly different. The "P" switch allows partially transferred file to be saved even if the rsync connection is terminated abruptly. rsync will automatically pick it up where it left off the next time you sync again. This is especially useful for transferring very large files.
  • Upon running sync_n900.bat, you will be prompted to enter password for user "santa".
  • And that's it! Now you can rsync multiple folders!

Nokia N900 guide: Sync folders between N900 and PC over wifi

Since I got my N900, one thing that I really wanted to do was to sync the DCIM folder (where the 5-megapixel camera stores its pictures and videos) with my Windows XP PC over wifi. After reading some posts on http://talk.maemo.org/, I knew that it would be possible but couldn't find anything that details the steps required to unleash the power of wireless sync between N900 and PC. In this post, I will explain to you step-by-step how to actually implement it.

N900:
  • Obtain root access to the N900 since you are going to be editing files in /etc. Follow instructions here.
  • [Optional] Download and install Open SSH. It's much easier to type on a full-sized keyboard than on the N900. Alternatively, you could use VNC the N900.
  • Using your favorite editor, edit the file /etc/default/rsync and enable rsync as root user. The line should say
RSYNC_ENABLE=true
  • Check that you have /etc/default/rcS. If not, create that file and paste the following content into it:
#
# /etc/default/rcS
#
# Default settings for the scripts in /etc/rcS.d/
#
# For information about these variables see the rcS(5) manual page.
#
# This file belongs to the "initscripts" package.

TMPTIME=0
SULOGIN=no
DELAYLOGIN=no
UTC=no
VERBOSE=no
FSCKFIX=no
  • Now, create the file /etc/rsyncd.conf with the following content. This defines which directories you want to sync.
max connections = 3
[camera]
path = /home/user/MyDocs/DCIM
uid = nobody
gid = 65534
  • In rsync.conf, I'm allowing only 3 simultaneous rsync connections to my N900. DCIM is the folder that I want the rsync client to synchronize and as a first step, anybody can get the files anonymously. (You may not want that if you are on a public wifi network. But since I'm going to be doing this on my home wireless network only, anonymous access is not a concern for me at this point.)
  • Now you are ready to start the rsync server. Type this
    /etc/init.d/rsync start

Now, go to a Windows machine on the same wireless network...
  • Download and install cwrsync.
  • Create the destination directory. For example, C:\Documents and Settings\N900 User\My Documents\My Pictures\From N900 Camera
  • Create a file called sync_n900.bat anywhere you like. (Feel free to name the batch file something else.)
  • set RSYNC="C:\Program Files\cwRsync\bin\rsync"
    %RSYNC% -az --progress 192.168.0.105::camera "/cygdrive/C/Documents and Settings/N900 User/My Documents/My Pictures/From N900 Camera"

    • Substitute 192.168.0.105 with the IP address of your N900.
    • Note: Since cwrsync really is rsync-under-cygwin, to specify C: drive, you have to write /cygdrive/C.
  • Alternatively, instead of a batch file, you can of course use other GUI wrappers for cwrsync.
  • If everything goes well, after running sync_n900.bat, you will see something like this:

  • Note that I can consistently get ~600kB/s at home through my 802.11g wireless router.
  • That's it!
Troubleshooting
rsync: opendir "/." (in camera) failed: Permission denied (13)

sent 28 bytes received 140 bytes 67.20 bytes/sec
total size is 0 speedup is 0.00
rsync error: some files/attrs were not transferred (see previous errors) (code 2
3) at main.c(1508) [generator=3.0.7]
  • Ensure the N900 is NOT in Mass Storage Mode (with USB data cable connected to a computer).

Monday, March 22, 2010

Nokia N900 guide: Re-flashing firmware

After heavily using the N900 and installing an insane amount of extras-devel and extras-testing apps onto it, it finally broke down and all the text strings were replaced with their variable names.


The instructions to reflash the N900 are very comprehensive. They cover pretty much all the different platforms so beginners may find them a bit intimidating. However, if you just focus on one platform, for example, flashing the N900 from Windows XP, you will find that the steps are actually quite straightforward.
(Note that you can skip the eMMC section for the N900.)

As of this writing, the latest global release firmware for the N900 is "RX-51_2009SE_2.2009.51-1_PR_COMBINED_MR0_ARM.bin".


http://wiki.maemo.org/Updating_the_tablet_firmware

Saturday, March 20, 2010

Nokia N900 guide - How to setup VNC server on the N900 and view it on Ubuntu

On the Nokia N900:
  • Download and install x11vnc from the extra-devels repository
  • Run x11vnc (under More Applications)
  • (You get a new x11vnc process each time you click the x11vnc icon. So just make sure you click it once.)
  • Obtain your N900 IP address by typing the following in the X Terminal: /sbin/ifconfig

  • In the above example, the IP address is 192.168.1.103.

On Ubuntu:
  • Make sure you have vnc viewer installed. If not, sudo apt-get install xtightvncviewer
  • Then type, vncviewer <N900's IP address>


(Alternatively, you can install tightvnc on your Windows machine to get the same result.)